

Step 1:
Download the appropriate app to measure the angle of the installed Baicells Antennas and submit them for CPI approval:


The antennas should be pointed towards highly populated areas like busy streets where lots of people walk around. These radios are highly affected by walls. So try to place these radios where they will have line of sight with people that would be on their smartphones. Each antenna will require 1 cable run. So if there are 3 antennas being installed you will need 3 separate cables from the radios going into the FreedomFi. You will need to first get yourself on the roof and attach the Jpipe or other mounting hardware. I will advise attaching it to the side of the roof so you don’t make any hole in the roof where water could come in and leak in and cause damage. After the antennas are installed and won’t be moved again, the most important part will be taking several photos of the install, I suggest taking multiple photos to avoid the need to go back on the roof. The photos must be clear. These are absolutely required.
Step 2:
To avoid confusion, take a photo of the radio's serial number to keep track of which photos belong to which radio.

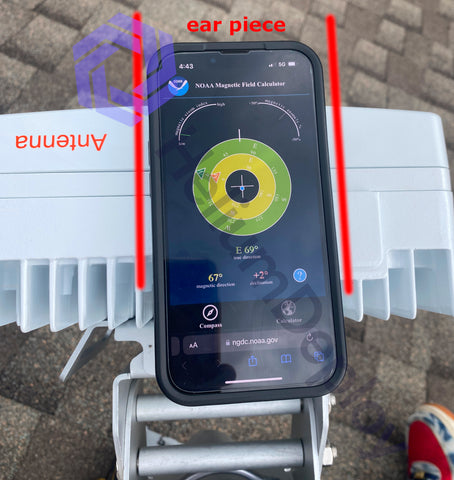
Step 3:
You will need to take the photos exactly how they are below, the numbers can be different but you must take the photo where the phone is visibly on the radio. To get the elevation angle, use the bubble level app linked at the top of this guide. Place the phone flush on the center of the antenna with the ear piece pointed in the direction the antenna covers.

Step 4:
Azimuth angle:
You must take a picture of the azimuth angle. Visit this link to calculate the azimuth angle. Make sure you allow access to the sensors inside your phone, you can test this by spinning around and making sure it moves with you. It’s the same process as above, place the phone on the center of the antenna with the earpiece facing towards the direction the antenna covers. 69 degrees in this case.
Step 5:
You are also required to take photos of the installation as viewed from the ground level and from the installed location facing the ground level. See below pictures


Step 6:
Once the antennas and cables are in place, the last step is to plug in the cables following the diagram below depending on how many antennas you have.

This completes the physical installation. Next is to complete the CPI registration using the photos we have just taken 👇.
1 comment
bad coverage object what is this mean?